How to create a Indian Fiscal Year Calendar Table in Power BI
If you are someone who works with Fiscal Calendar that does not start with Jan and end in December, you are going to love this post. In this post, I’ll teach you how can you calculate Custom Fiscal Year in Power BI.
And since I am based in India my examples will be with dates as per Indian Financial Calendar which starts in Apr and ends in Mar. You may modify the formulas to suit your need
How to create a Fiscal Year Calendar in Power BI
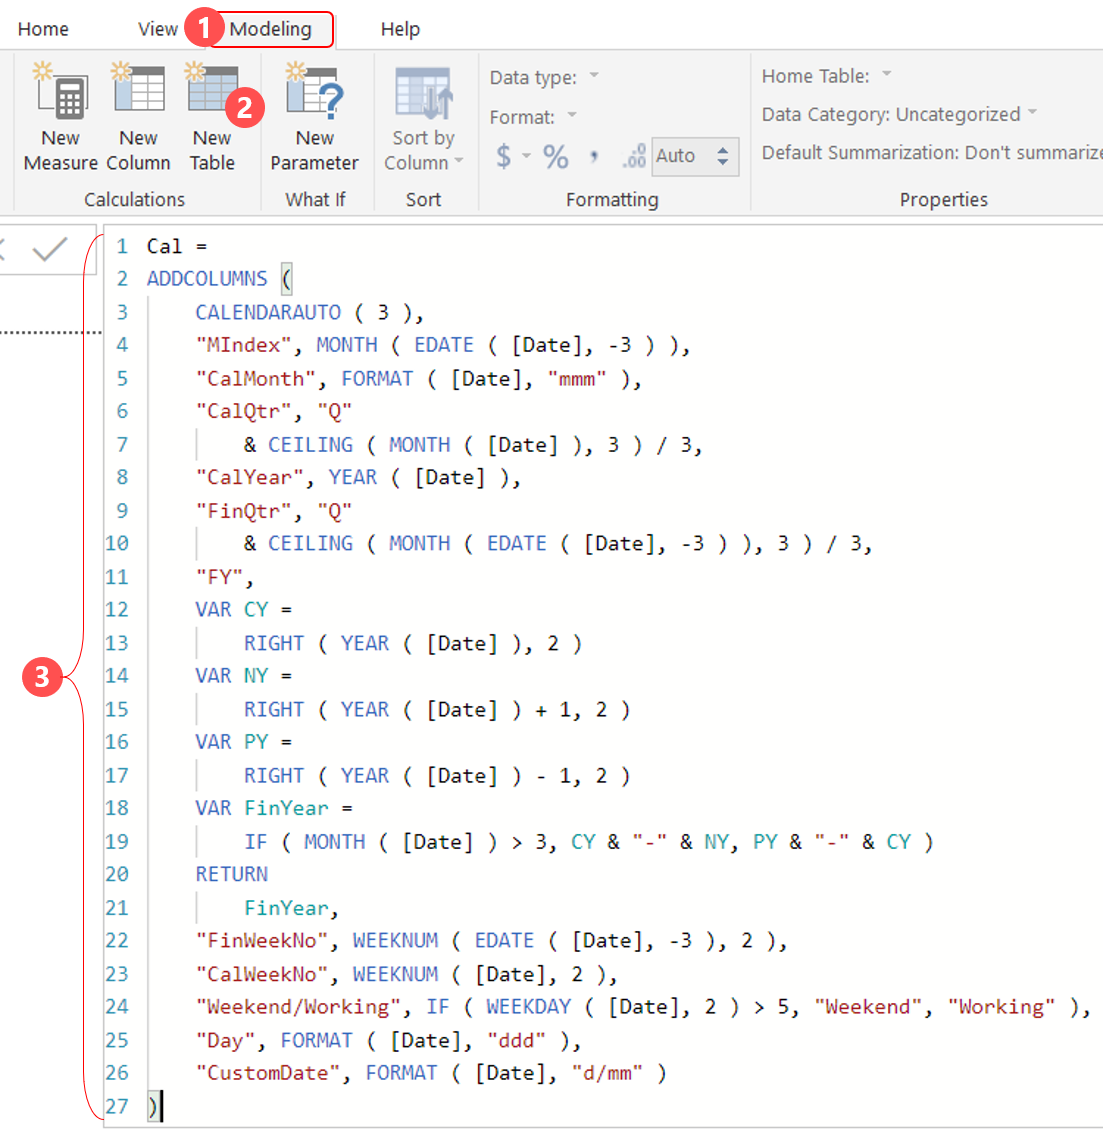
Using almost the same logic for year and quarter along with a few other columns here is the Pre-Built DAX Code that creates a Calendar Table
Calendar =

--Inputs--
VAR WeekStartsOn = "Mon"
VAR FiscalStartMonth = 4

--NOTE: Calendar week starts from Monday

--Calculation--
RETURN
    ADDCOLUMNS (
        CALENDARAUTO ( FiscalStartMonth - 1 ),
        "MIndex", MONTH ( [Date] ),
        "FiscalMIndex", MONTH ( EDATE ( [Date], - FiscalStartMonth + 1 ) ),
        "CalMonth", FORMAT ( [Date], "mmm" ),
        "CalQtr", "Q"
            & CEILING ( MONTH ( [Date] ), FiscalStartMonth - 1 ) / ( FiscalStartMonth - 1 ),
        "CalYear", YEAR ( [Date] ),
        "Fiscal Week",
        VAR FiscalFirstDay =
            IF (
                MONTH ( [Date] ) < FiscalStartMonth,
                DATE ( YEAR ( [Date] ) - 1, FiscalStartMonth, 1 ),
                DATE ( YEAR ( [Date] ), FiscalStartMonth, 1 )
            )
        VAR FilteredTableCount =
            COUNTROWS (
                FILTER (
                    SELECTCOLUMNS ( GENERATESERIES ( FiscalFirstDay, [Date] ), "Dates", [Value] ),
                    FORMAT ( [Dates], "ddd" ) = WeekStartsOn
                )
            )
        VAR WeekNos =
            IF (
                FORMAT ( FiscalFirstDay, "ddd" ) <> WeekStartsOn,
                FilteredTableCount + 1,
                FilteredTableCount
            )
        RETURN
            "Week " & WeekNos,
        "Fiscal Qtr", "Q"
            & CEILING ( MONTH ( EDATE ( [Date], - FiscalStartMonth + 1 ) ), 3 ) / 3,
        "Fiscal Year",
        VAR CY =
            RIGHT ( YEAR ( [Date] ), 2 )
        VAR NY =
            RIGHT ( YEAR ( [Date] ) + 1, 2 )
        VAR PY =
            RIGHT ( YEAR ( [Date] ) - 1, 2 )
        VAR FinYear =
            IF ( MONTH ( [Date] ) > ( FiscalStartMonth - 1 ), CY & "-" & NY, PY & "-" & CY )
        RETURN
            FinYear,
        "CalWeekNo", WEEKNUM ( [Date], 2 ),
        "Weekend/Working", IF ( WEEKDAY ( [Date], 2 ) > 5, "Weekend", "Working" ),
        "Day", FORMAT ( [Date], "ddd" ),
        "CustomDate", FORMAT ( [Date], "d/mm" )
    )
How to use this DAX Code
You can simply copy and paste the code in Power BI. To be precisely follow the steps
Open one of your existing Power-BI file (with some data)
- Go to Modeling Tab
- Click on New Table
- Paste the code and a new Cal table will be created with 12 columns (FY and Financial Qtrs being the 2 of them)
Resulting Calendar Table in your Power BI would look like this
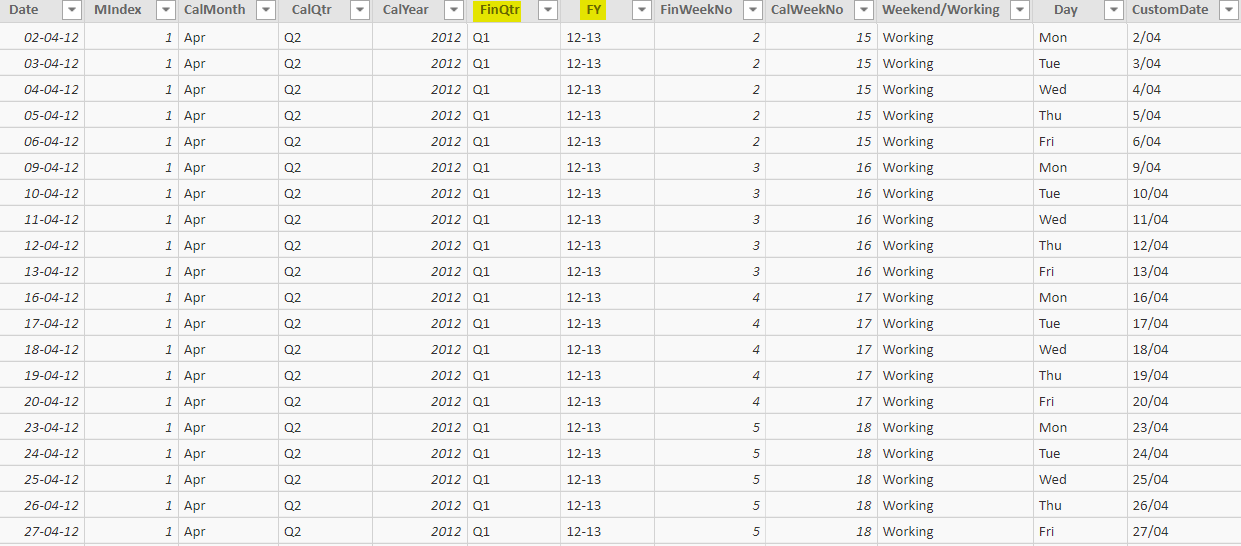
Things to check –
- Just be sure to load some data with one of the columns as the date in the Power BI file before you paste the code. Rest will fall in place automatically
- And do create a relationship between the two tables.


Comments
Post a Comment